Contents
- Logging In
- Main Window and Top Menu
- Map and Live Tracking
- “Service” Menu
- “Reports” Menu
- Current User Settings and Logout
- Access Rights and Administrative Roles
- Data Retention and Automatic Cleanup
- Workstation Requirements
Logging In
The login page opens when you navigate to the Glovizor address in your browser and after you log out of the current session. To log in, you need a valid user account with access enabled.
After a fresh Glovizor installation, use the default credentials:
- User:
admin - Password: none — leave the password field blank.
After your first login, it is recommended to set a password for the admin user immediately.
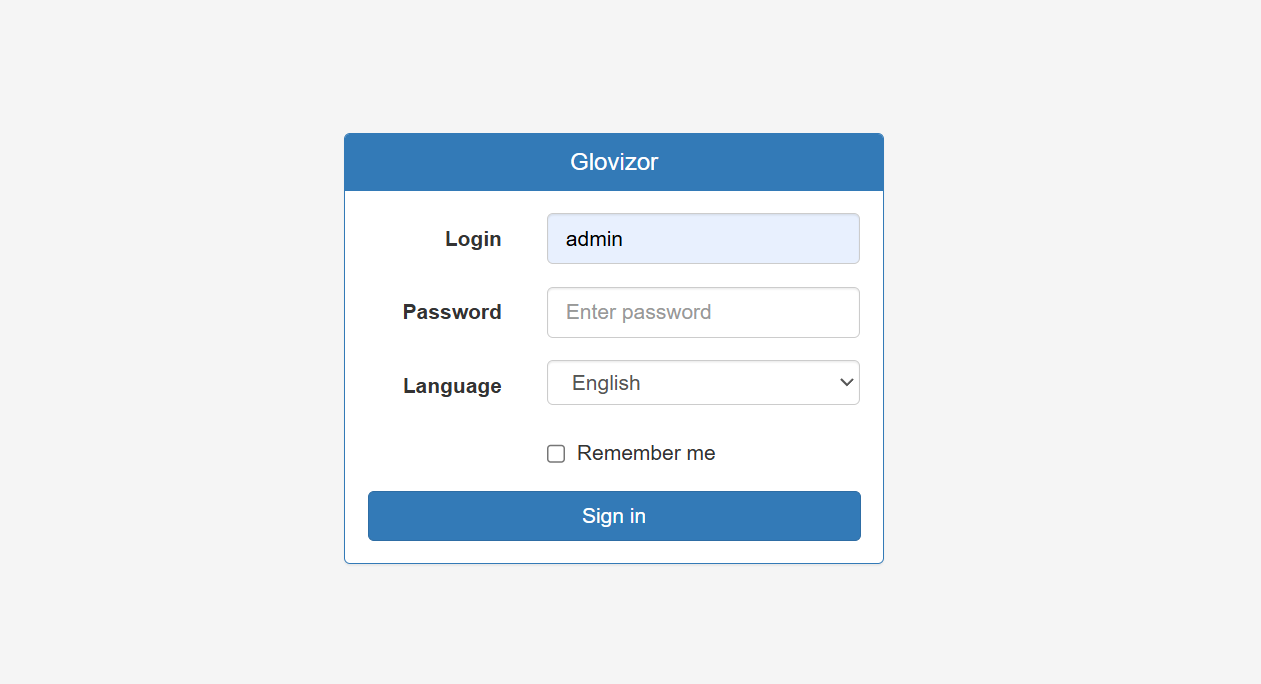
Login Page Elements
Page title — the name of the current Glovizor installation. It is set by the server administrator; the same name may also be displayed on the browser tab.
“Login” field — the user account name.
“Password” field — the account password. Entered characters are hidden.
“Language” list — selects the user interface language.
“Remember me” checkbox — allows Glovizor to be reopened in this browser without signing in again. The saved login remains valid for 90 days.
“Log In” button — authenticates the user and opens the main window.
How to Log In
- Open the Glovizor web interface address.
- Enter your login.
- Enter your password.
- Select the interface language.
- If necessary, select the “Remember me” checkbox.
- Click “Log In”.
Main Window and Top Menu
After logging in, the main window opens. The top panel contains the main sections, map selection, the current user name, service information, and the logout command. The available menu items depend on the user’s permissions.
Top Menu Items
“Map” — opens the live tracking screen: object list, tracks, and user-defined places.
“Service” — opens management of objects, groups, users, device models, protocols, sections, retransmitters, server settings, and logs. The available items depend on the user’s role and permissions.
“Reports” — opens reports on distance traveled, stops, and speeding, as well as object messages and message dumps.
Map list — switches the map provider. The available set is configured by the server administrator.
User name — opens the current user account details.
Information icon — opens a window with information about the service.
Logout icon — ends the session and returns to the login page.
Global settings, sections, “Log Viewer”, and “Message Dumps” are available only to the server administrator.
Map and Live Tracking
The “Map” section is used to view the current location of objects, build tracks, execute commands, and work with user-defined places.
“Objects” Tab

The tab shows the objects available to the user and allows you to select which of them are displayed on the map.
“Group” list — limits the list to the selected group. “All Groups” displays all available objects.
“Follow Selected” checkbox — automatically changes the map position and zoom level so that the selected objects remain within the visible area.
Select all objects command — selects all rows or clears all selections.
Search field — filters the object list by the entered text.
Apply filter button — applies the search condition.
Clear filter button — clears the search and restores the full list.
Add button — opens the new object form if the user has permission to edit objects.
Edit button — opens the selected object form.
Delete button — deletes the selected object if the user has the required permission. Before the object is deleted, a “Delete object?” confirmation is displayed.
Execute command button — opens the window for sending a command to the selected GPS tracker.
Checkbox in the object row — includes or excludes the object from display on the map.
Status indicator in the row — shows the object status and performs no action when clicked.
Chart icon on the right side of the row — builds the selected object’s track for the current day.
Object Status
Green indicator — the object is online and moving.
Red indicator — the object is online and stopped.
Gray indicator — no data has been received from the object for more than 5 minutes; the object is considered offline. The gray indicator shows the last known moving or stopped state.
Colored “?” icon — the object is online, but no GPS position data is available.
Object Information Area
After selecting an object row, the latest available data is displayed at the bottom of the panel:
- Object;
- Status;
- Position time;
- Report time;
- Satellites;
- Latitude;
- Longitude;
- Speed;
- Course;
- Altitude.
How to Select Objects on the Map
- Open the “Objects” tab.
- If necessary, select a group.
- Use search if the list is large.
- Select the checkboxes next to the objects you want to display on the map.
- Enable “Follow Selected” if the map should automatically keep the selected objects within the visible area.
- Click an object row to view its latest data.
Map Selection
The map provider is selected from the top panel. The server administrator determines which maps are available to users. The installation can use OpenStreetMap, Yandex Maps, and Google Maps.
Google Maps — an API key is required.
Yandex Maps — in the current implementation, it can work without an API key; a custom configuration can be used for a specific installation if necessary.
“Tracks” Tab
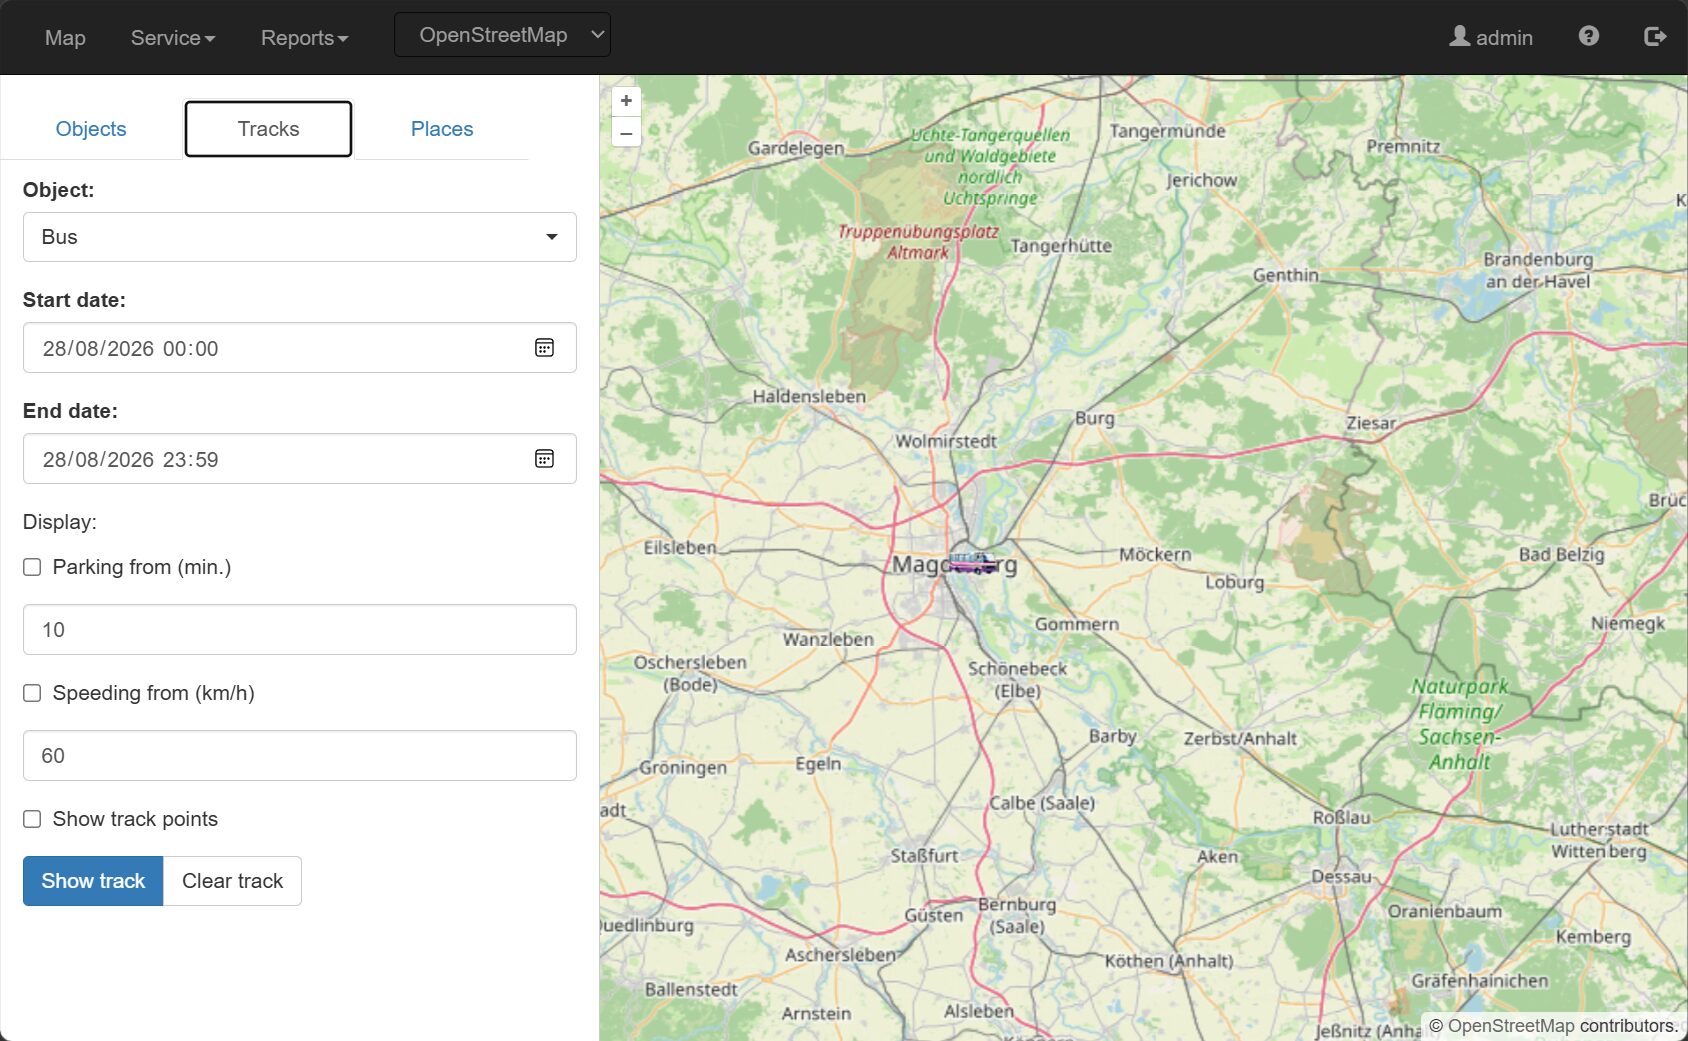
The tab builds a route for one selected object over a specified period. Only one track can be displayed on the map at a time. The maximum available period may be limited by the server administrator.
“Object” — selects the object for which the track will be built.
“Start date” — specifies the start date and time of the period.
“End date” — specifies the end date and time of the period.
“Parking from (min.)” — enables markers for parking periods lasting at least the specified number of minutes.
“Speeding from (km/h)” — highlights sections where the speed exceeds the specified threshold.
“Show track points” — displays individual recorded positions.
“Show track” — loads the data and builds the track.
“Clear track” — removes the track and related markers from the map.
Track point details — show the date and time, coordinates, altitude, speed, course, and number of satellites.
Markers — indicate the start and end of the track, parking periods, and other selected events.
How to Build a Track
- Open the “Tracks” tab.
- Select an object.
- Specify the start and end of the period.
- If necessary, enable parking detection and specify the minimum duration.
- If necessary, enable speeding detection and specify the threshold.
- If necessary, enable track point display.
- Click “Show track”.
- Click a point or marker to view its details.
- To remove the route from the map, click “Clear track”.
Executing Commands from the Map
Commands are sent to the selected GPS tracker. The available commands depend on the device model, protocol, commands assigned to the object, and the “Map: execute commands” permission.
“Object” field — shows the device to which the command will be sent.
“Command” field — selects one of the commands assigned to the object.
Command parameters — depend on the specific protocol and selected command type.
Execute button — generates and sends the command to the device.
Cancel button — closes the window without sending the command.
A separate command log and the result of command execution by the device are not displayed in the interface.
“Places” Tab
User-defined places are named points on the map. Places are shared within a section; there is no separate visibility filter by user. A user can see the section’s places if they have the corresponding permission.
Select all places command — shows or hides all available places.
Add button — opens the new place form.
Edit button — opens the selected place.
Delete button — deletes the selected place if the user has the required permission.
“ID” field — internal record identifier.
“Name” field — place name.
“Latitude” and “Longitude” — point coordinates.
“Icon” field — marker image on the map.
Image selection button — opens the icon library.
Double-clicking the map while a place form is open transfers the selected coordinates to the form.
“OK” button — saves the changes; “Cancel” — closes the form without saving.
“Service” Menu
The “Service” menu combines data management and configuration functions. The availability of menu items is determined by the user’s permissions and role.
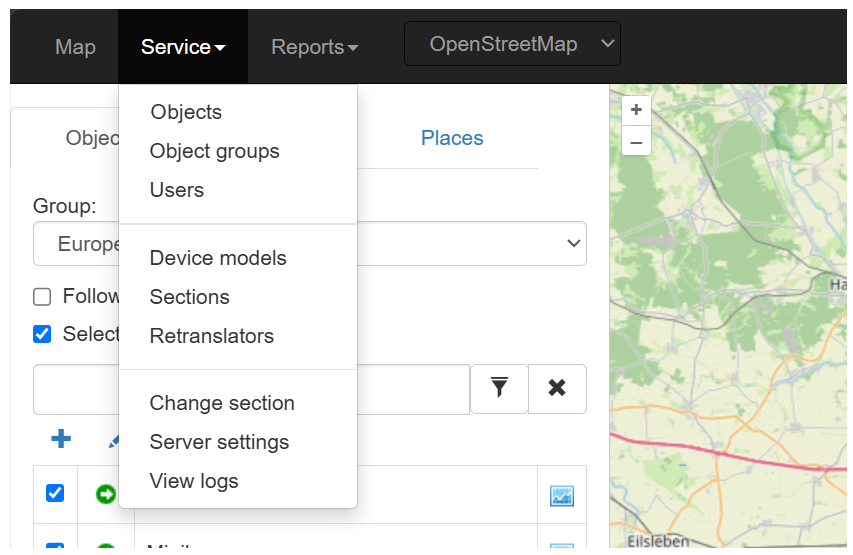
Objects
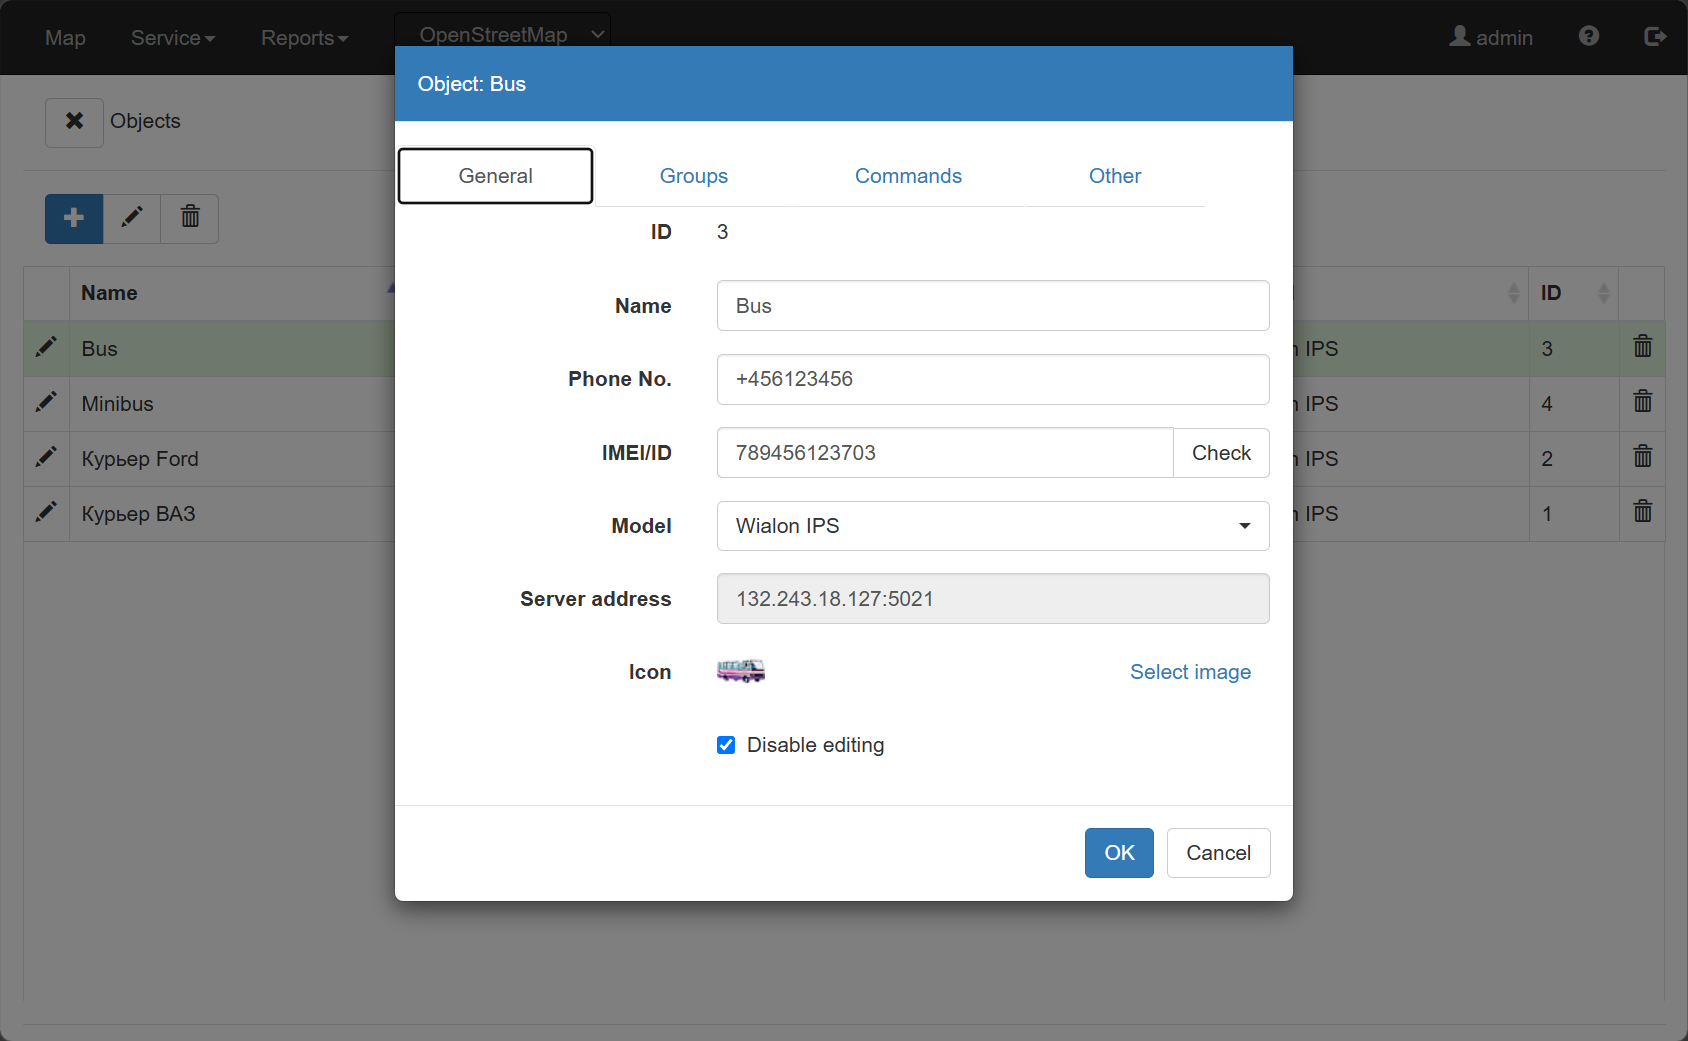
This section contains a list of monitored objects. An object can be created, edited, or deleted if permitted by the user’s access rights.
“Name” column — object name.
“IMEI” column — GPS tracker identifier.
“Phone” column — SIM card number or associated phone number.
“Model” column — selected GPS tracker model.
“ID” column — internal object identifier.
Object Form: Main Parameters
“ID” — internal identifier. For a new record, it is assigned by the system.
“Name” — object name used in lists, on the map, and in reports.
“Phone No.” — phone number of the tracker’s SIM card or associated number.
“IMEI/ID” — identifier used by the server to associate incoming data with the object.
“Check” button — checks whether the entered IMEI/ID is unique within the service.
“Model” — selects the GPS tracker model. The model determines the protocol and data reception port used.
Server address and port — parameters that must be specified in the GPS tracker settings. If the global server address is not configured, the user sees only the port.
“Icon” — object image on the map; the image selection command opens the icon library.
“Disable editing” — protects the object from being modified by regular users. The checkbox is available to the server administrator.
“OK” — saves the changes; “Cancel” — closes the form without saving.
Object Groups
An object can be included in one or more groups. Groups are used to filter objects and restrict user access.
Object Commands
The “Commands” tab defines the set of commands that can then be sent to the object from the map. The actual set depends on the protocol of the selected model.
Add button — assigns a new command to the object.
Edit button — edits the selected command.
Delete button — removes the command assignment.
The interface includes, among others, commands for device identification, device reboot, and output control. The command parameters are determined by the specific protocol; there is no universal set of parameter values for all devices.
Other Object Parameters
The “Other” tab contains fuel consumption rates used in the “Distance traveled” report.
“Summer consumption, L/100 km” — standard summer fuel consumption rate.
“Winter consumption, L/100 km” — standard winter fuel consumption rate.
“Winter from” — day and month when the winter rate begins.
“Winter to” — day and month when the winter rate ends.
Fuel consumption in the report is calculated. These fields are not related to the fuel level sensor and do not show actual fuel consumption.
Object Groups
A group combines multiple objects. One object can belong to multiple groups at the same time.
“ID” — internal group identifier.
“Name” — group name.
“Disable editing” — protects the group from being modified by regular users.
Object list — allows you to select the objects included in the group.
“OK” — saves the group; “Cancel” — closes the form without saving.
Users
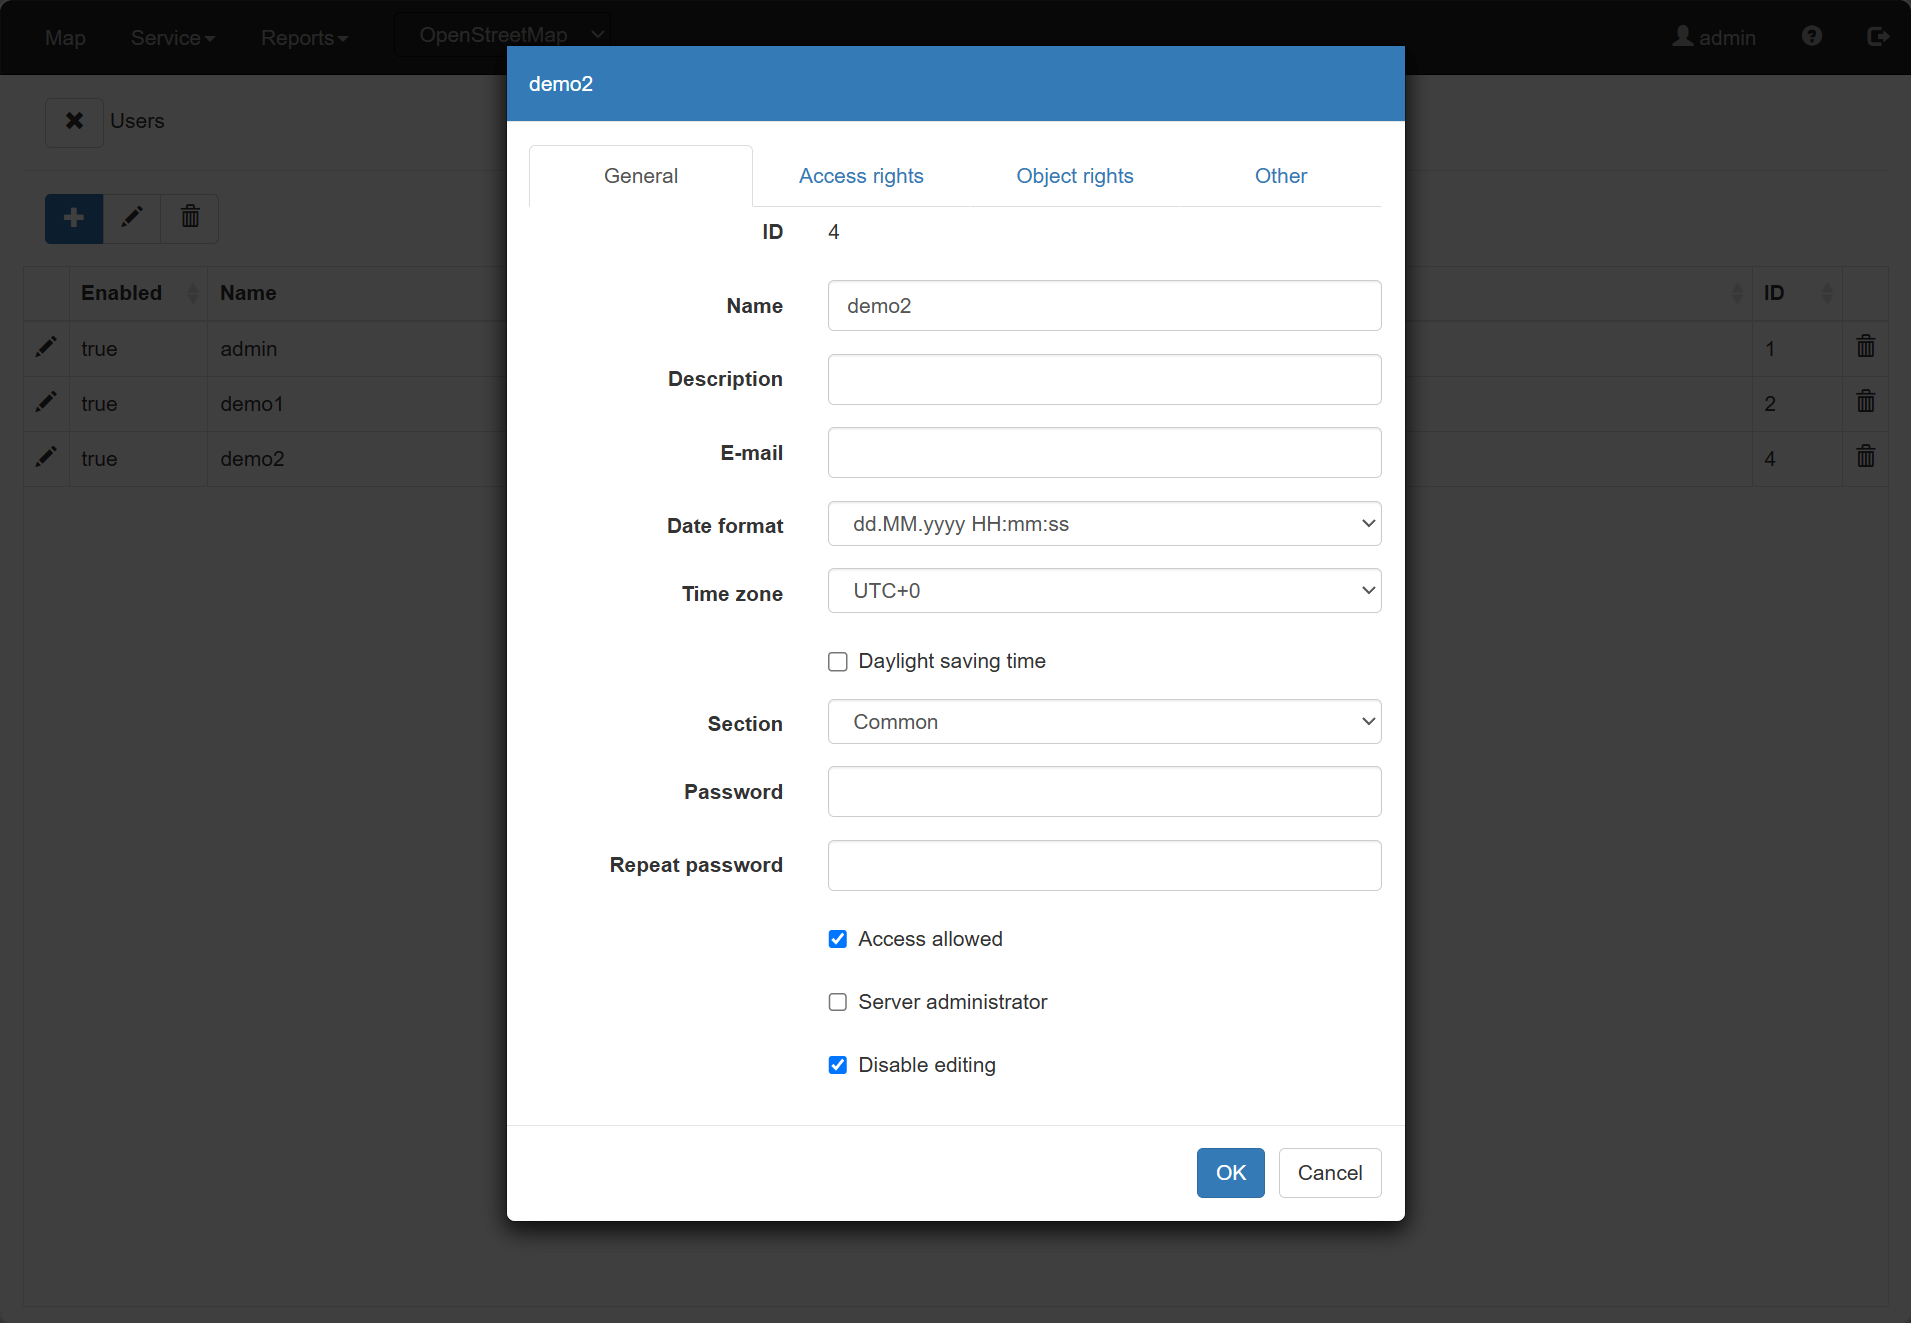
This section manages user accounts, personal settings, permissions, and access to object groups.
“Enabled” — shows whether the user is allowed to log in.
“Name” — user login.
“Description” — comment or purpose of the account.
“Section” — user’s section.
“ID” — internal user identifier.
Main User Parameters
“ID” — internal identifier.
“Name” — login.
“Description” — account comment.
“E-mail” — email address.
“Date format” — date and time display format.
“Time zone” — user’s time offset from UTC.
“Section” — section in which the user works.
“Password” and “Repeat password” — set the user’s password.
“Daylight saving time” — enables seasonal time adjustment.
“Access allowed” — allows the user to log in to the system.
“Server administrator” — enables the global administrative role.
“Disable editing” — protects the account from being modified by regular users; the checkbox is available to the server administrator.
A user can be reassigned to another section. Objects, groups, and other data are not transferred between sections this way.
Access Rights
For a regular user, permissions are configured using individual checkboxes:
- “Map: edit own settings”;
- “Map: build track”;
- “Map: execute commands”;
- “Objects: view”, “Objects: edit”, “Objects: delete”;
- “Object groups: view”, “Object groups: edit”, “Object groups: delete”;
- “Users: view”, “Users: edit”, “Users: delete”;
- “My places: view”, “My places: edit”, “My places: delete”;
- “Geofences: view”, “Geofences: edit”, “Geofences: delete” — these permissions are present in the access rights, but the geofencing feature is not yet implemented;
- “Allow reports”.
Object Rights
User access to objects can be restricted by groups. The selected groups determine which objects are available to the user.
If the user should have access to all objects in their section, no groups need to be selected in the object access rights section. If no group is selected, all objects in the section are available within the granted functional permissions.
Other
“Speeding from (km/h)” — the user’s default speeding threshold.
“Parking from (min.)” — the user’s default minimum parking duration.
Device Models and Protocols
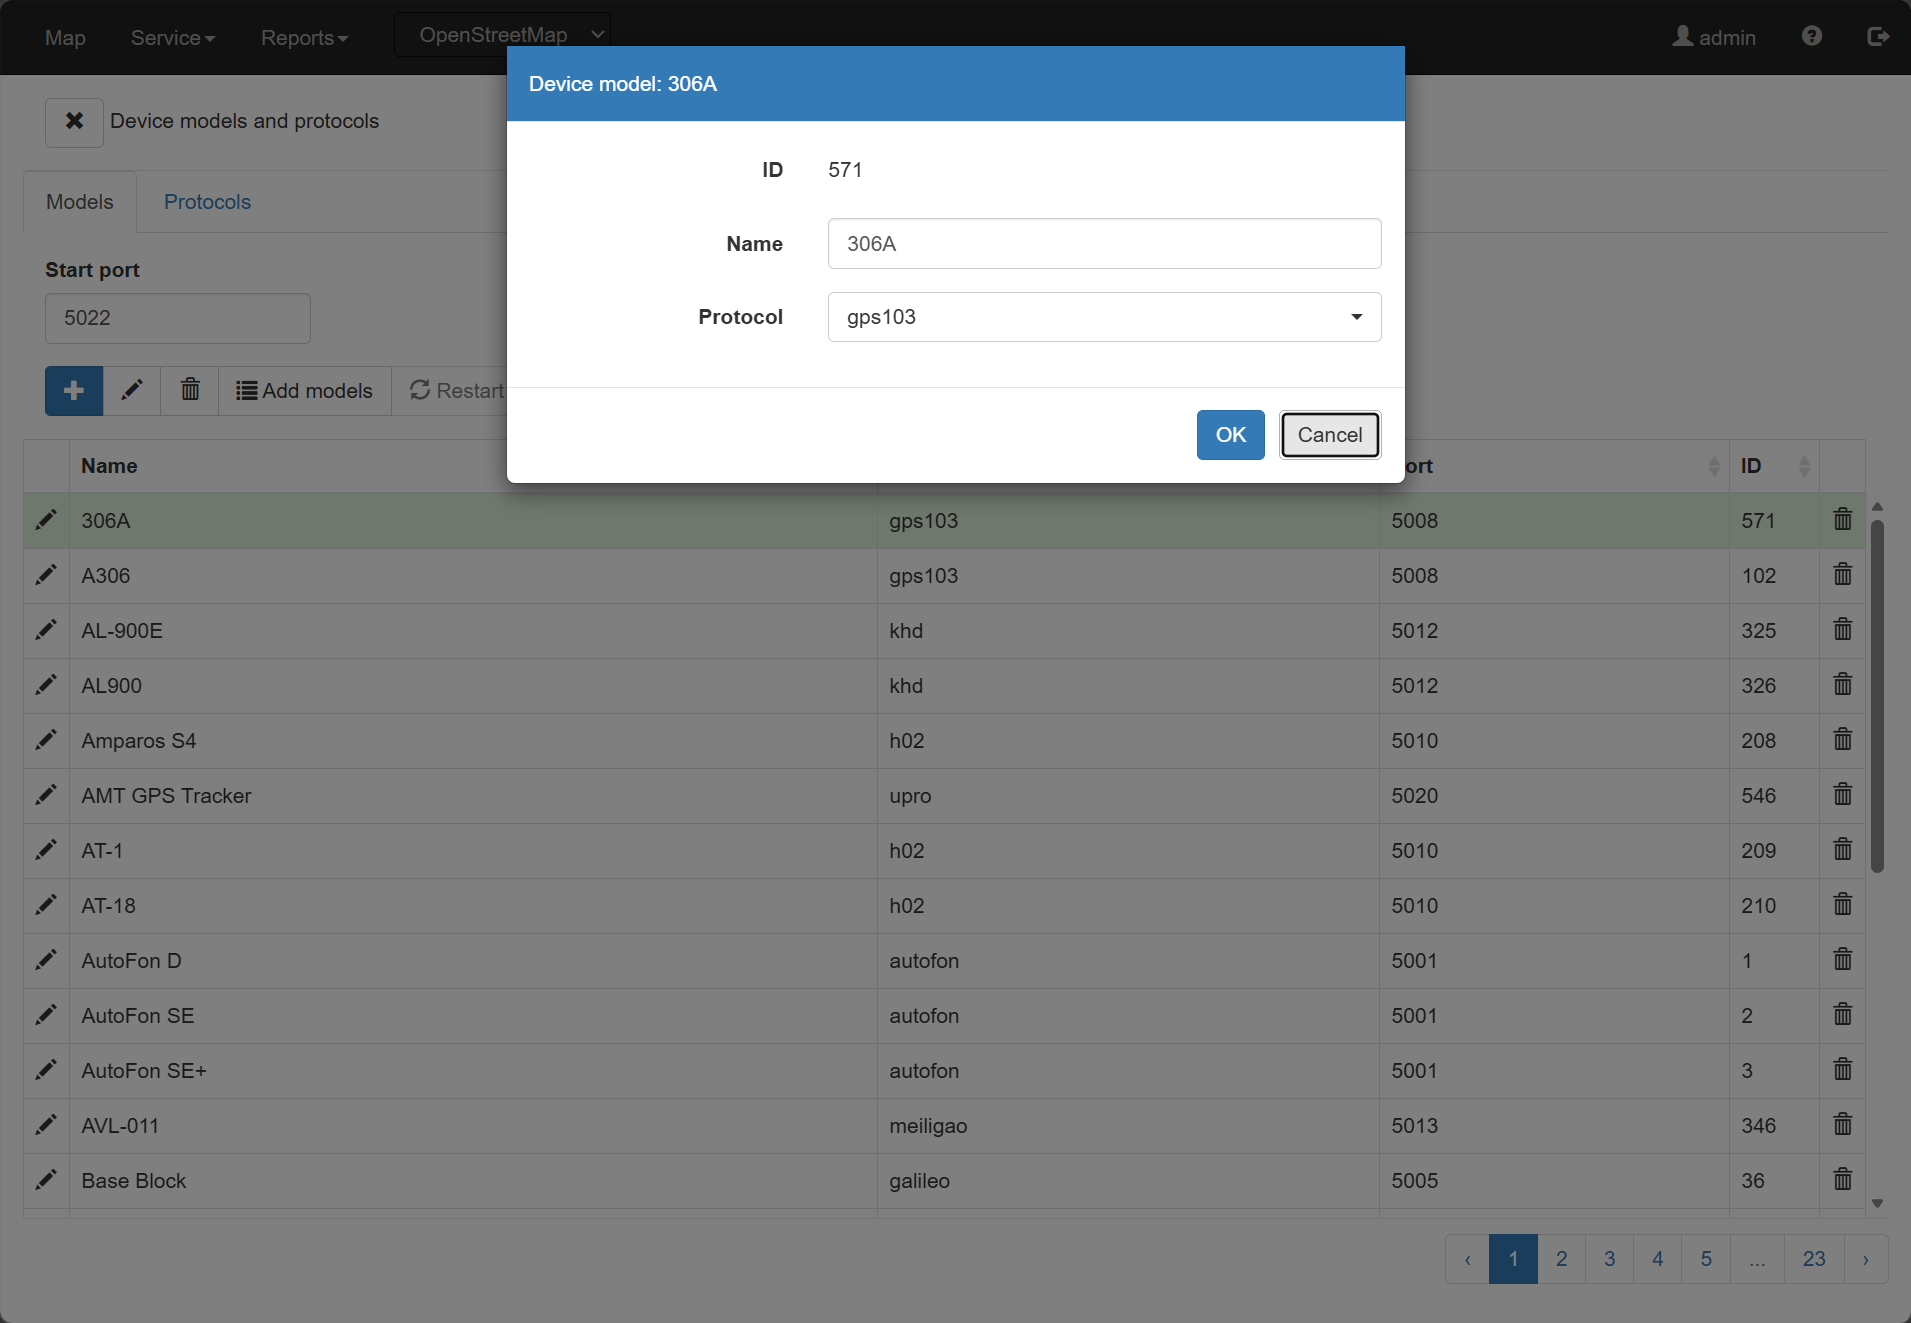
This section links supported GPS tracker models to protocols and data reception ports. For normal configuration, it is recommended to add models: the required protocols are created automatically.
Before adding the first model or protocol, it is recommended to specify the “Initial port” once — the first available port in the allocated range. When models are added in bulk later, ports are assigned sequentially.
Adding Models
“Protocol” filter — limits the list to models using the selected protocol.
Available models list — shows the models that can be added.
“Select all” — selects all models; “Clear selection” — clears the selection.
“Add” — adds the selected models and creates any missing protocols.
“Cancel” — closes the window without making changes.
Protocol Parameters
“Name” — protocol implementation name.
“Port” — network port used to receive data.
“Write debug dump of incoming data” — enables saving incoming data for diagnostics.
“Read information” — displays technical information about the implementation and supported commands.
The data reception server uses TCP. UDP is not used.
Applying Changes
After adding models, changing protocols, or reassigning ports, the GPS data reception “server” component must be restarted. During the restart, active connections are disconnected, after which the listener starts again with the current settings.
Sections
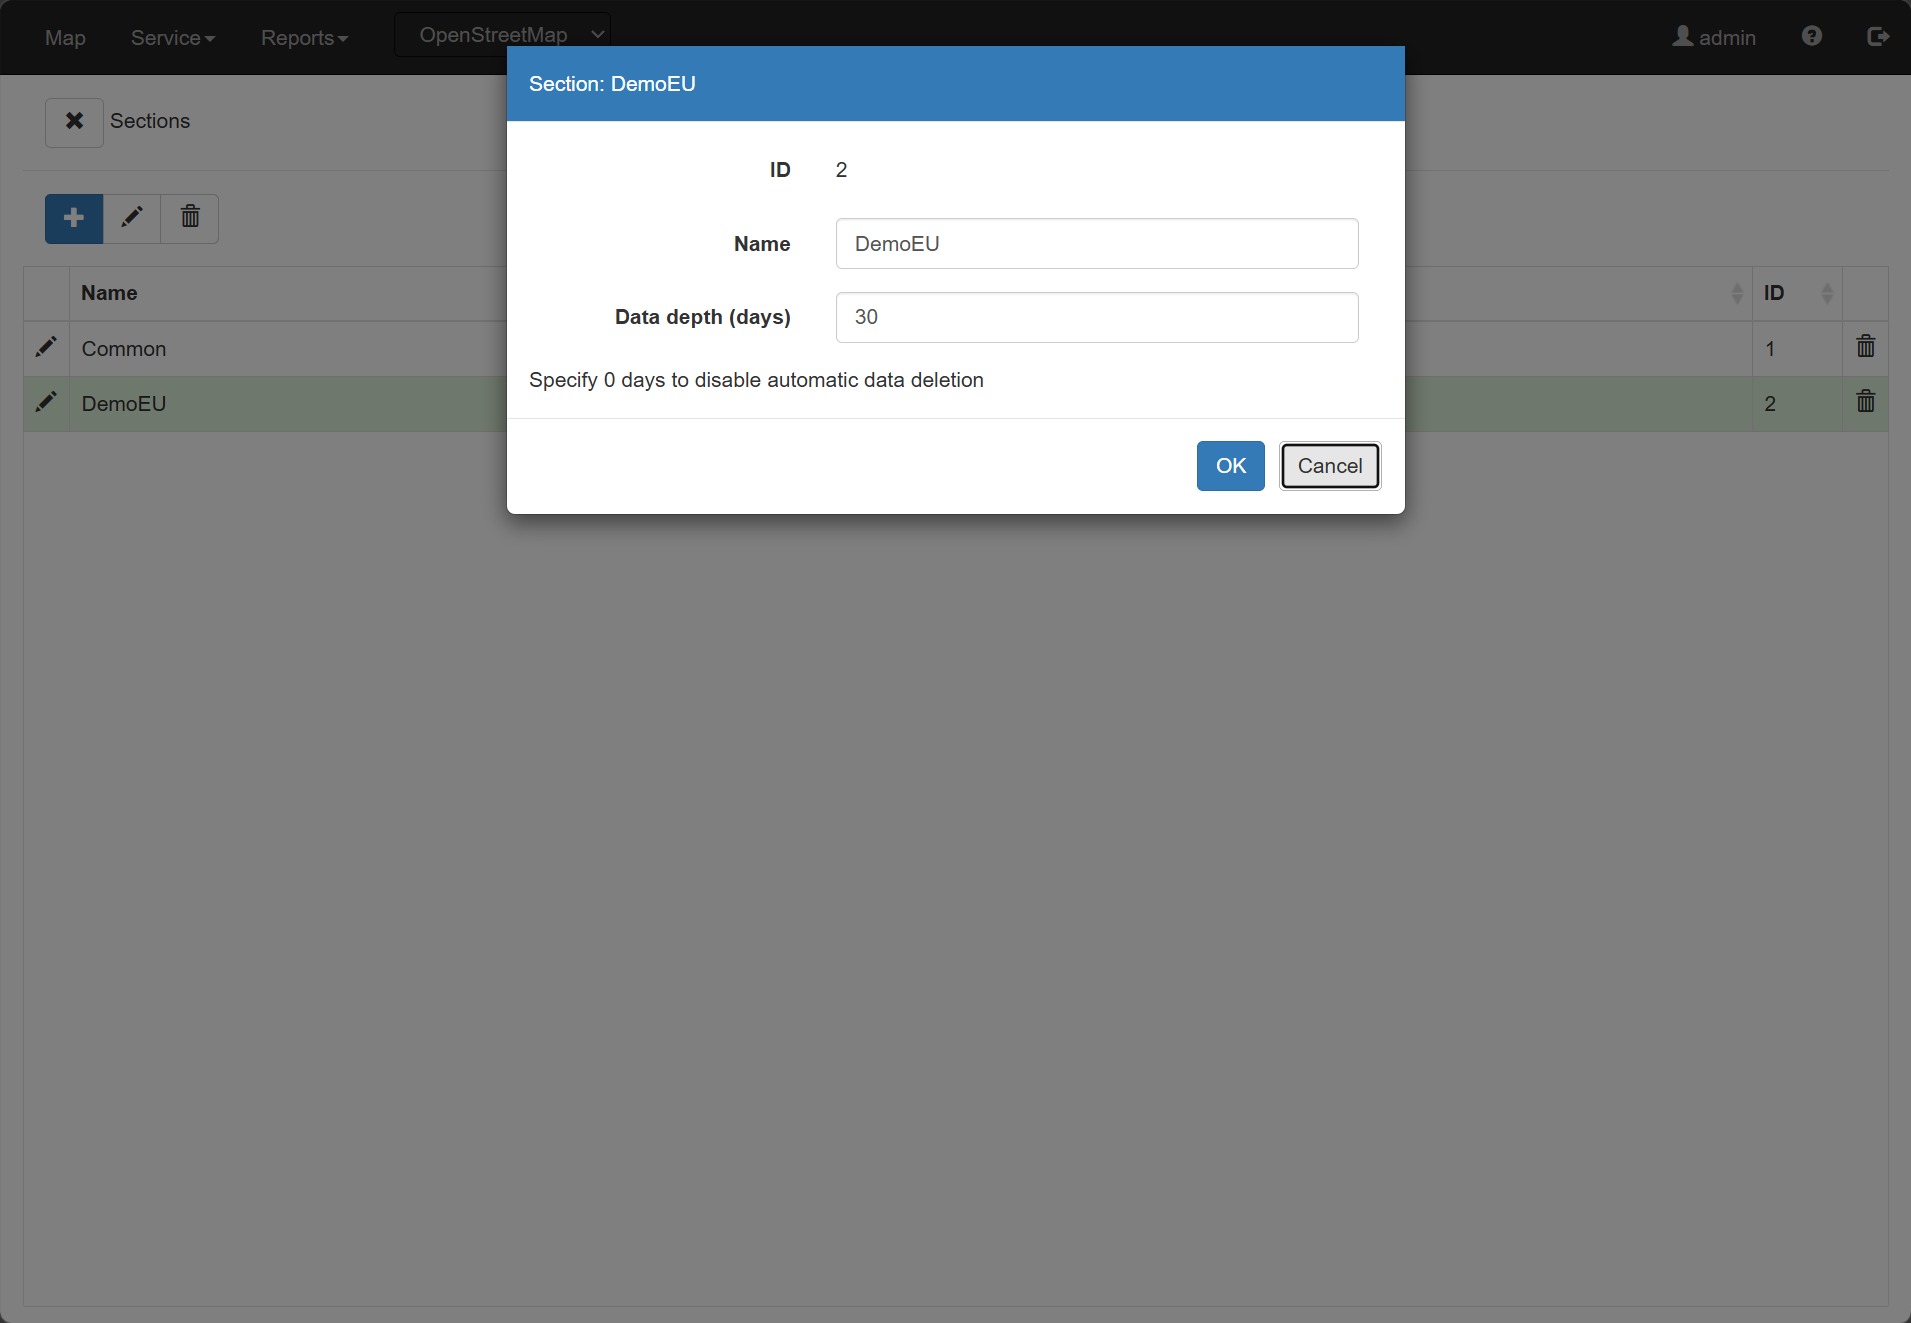
A section isolates the data of an individual customer, organization, or department. Objects, groups, and users are created within the context of the current section.
“Name” — section name.
“Data retention period, days” — retention period for the section’s GPS data. Data older than the specified period is deleted automatically.
“OK” — saves the section; “Cancel” — closes the form without saving.
Sections are available only to the server administrator. The administrator can create sections, switch between them, and manage the data of the selected section. Through the interface, only a user can be reassigned to another section; objects, groups, and other entities are not transferred.
Switching Sections
- Open the “Service” menu.
- Select the section switching command.
- Select the required section.
- Click “Go to section”.
- The interface will load the data for the selected section.
Retranslators
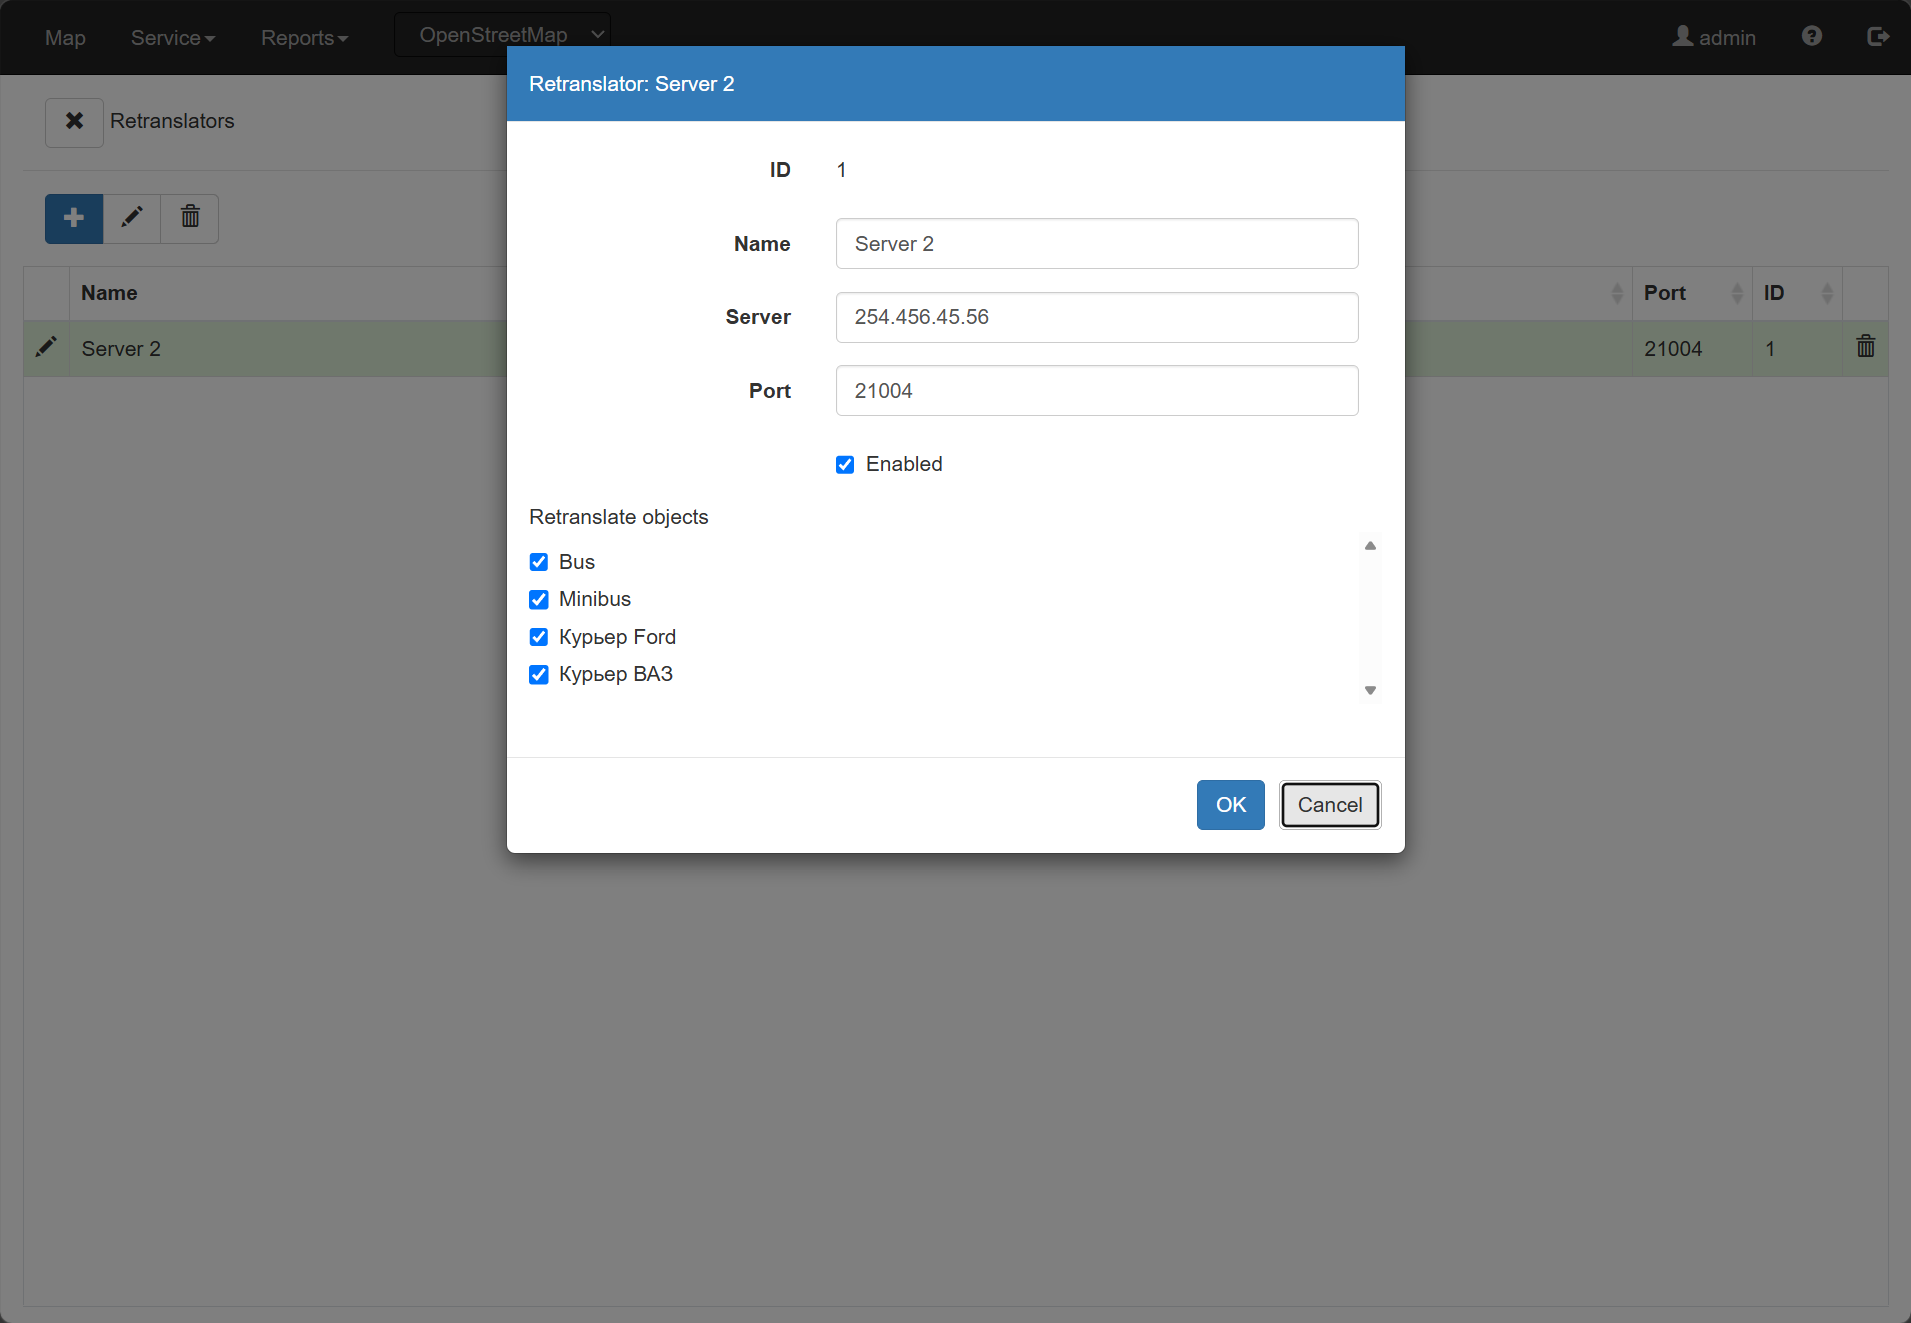
A retransmitter forwards incoming GPS data to another GPS server as the data is received. The current implementation uses the Wialon IPS 1.0 protocol.
“Name” — retransmitter name.
“Server” — address of the external GPS server.
“Port” — port of the external server.
“Enabled” — enables or stops data forwarding.
Object list — determines which objects’ data will be retransmitted.
“OK” — saves the settings; “Cancel” — closes the window without saving.
There is no queue or retry mechanism. The sending result is not analyzed, except for connection failures.
Server Settings
Server settings are available only to the server administrator and apply to the entire Glovizor installation.
Version information — shows the versions of Glovizor components, the web server, runtime environment, operating system, and MySQL.
Available maps list — determines which map providers users can select.
Initial latitude and longitude — define the map center when the interface is opened for the first time by a new user.
“Tracker server address” — the address displayed in the object form after a model is selected. If no address is specified, only the port is displayed in the form.
“Default object icon” — the icon file name assigned to new objects.
“Page title” — the name displayed in the login window and on the browser tab.
“Service information” — the text shown to users in the service information window.
Google Maps requires an API key. Yandex Maps can work without an API key in the current implementation.
Log Viewer
The “Log Viewer” item is available only to the server administrator. The interface allows viewing logs of the built-in HTTP server, the GPS data reception server, and the configuration application. Depending on the log, it may contain errors and debugging information.
File list — selects a log for viewing.
“Refresh” — reloads the list or the contents of the selected log.
Content area — displays the text of the selected file.
“Reports” Menu
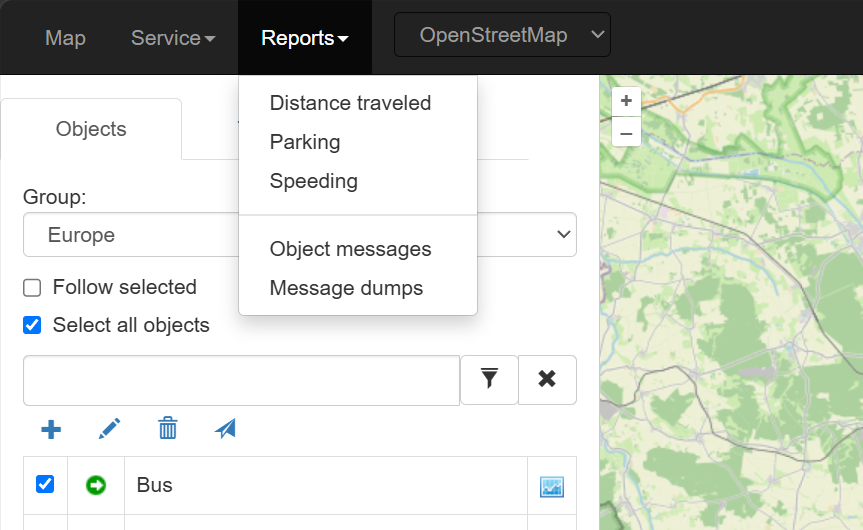
User reports are available when the “Allow reports” permission is enabled. A report is generated for the selected object or group over the specified period. The “Message Dumps” section is administrative and is available only to the server administrator.
“Distance traveled” Report
The report shows the distance traveled and speed statistics for the selected period. If fuel consumption rates are configured, fuel consumption is also calculated.
“Object / Object group” switch — determines the data source.
Object or group selection field — selects an object or group.
Start and end of the period — define the calculation interval.
“Execute” — generates the report.
“Object” — object name.
“Distance, km” — distance traveled.
“Maximum speed, km/h” — maximum recorded speed.
“Average speed, km/h” — average speed for the calculation period.
“Fuel consumption, L” — calculated value based on the distance traveled and the summer or winter consumption rate specified in the object settings.
The report does not use fuel level sensor data and does not show actual fuel consumption.
“Parking” Report
The report shows parking periods for an object or group over the selected period. The user specifies the minimum parking duration to include in the results.
Start and end of the period — define the report period.
“Parking from (min.)” — minimum parking duration.
“Execute” — generates the report.
“Start” and “End” — start and end time of the parking period.
“Duration” — parking duration.
“Latitude” and “Longitude” — parking coordinates.
Selecting a row allows you to show the selected parking location on the map.
“Speeding” Report
The report shows instances where the speed exceeds the threshold specified by the user. An instance continues as long as the speed remains above the specified threshold.
“Speeding from (km/h)” — speed threshold for the report.
“Start” and “End” — start and end of the speeding instance.
“Min.” and “Max.” — minimum and maximum speed during the instance.
“Distance” — distance traveled during the instance.
Selecting a row allows you to show the corresponding location or section on the map.
Object Messages
This section shows stored GPS messages for the selected object over the specified period.
“Object” — selects the source of the messages.
Start and end of the period — limit the data selection.
Filter by record date or GPS date — selects which timestamp is used to filter messages.
“Execute” — loads the messages.
Message list — shows the record date, GPS date, IMEI, coordinates, altitude, speed, course, number of satellites, validity status, error, and message parameters.
Data import and export in this section are administrative functions and are available only to the server administrator.
The GPS data retention period is configured for the section. For details, see “Data Retention and Automatic Cleanup”.
Message Dumps
The “Message dumps” section is available only to the server administrator. Data is displayed only for protocols where the “Write debug dump of incoming data” option has been enabled in advance.
Start and end of the period — limit the data selection by time.
Protocol or port filter — shows only records for the selected protocol or network port.
“All connections” — shows all registered connections.
“Unrecognized” — shows connections that could not be associated with an object or processed correctly.
Object filter — shows only records for the selected object.
Level filter — shows all records, errors only, or debug messages only.
“Execute” — loads data matching the selected conditions.
Results list — shows the date, port, object ID, IP address, session ID, message level, and comment.
Dump area — shows the raw data of the selected record.
The message dump retention period and daily cleanup settings are configured in the setting.cfg configuration file. For details, see “Data Retention and Automatic Cleanup”.
Current User Settings and Logout
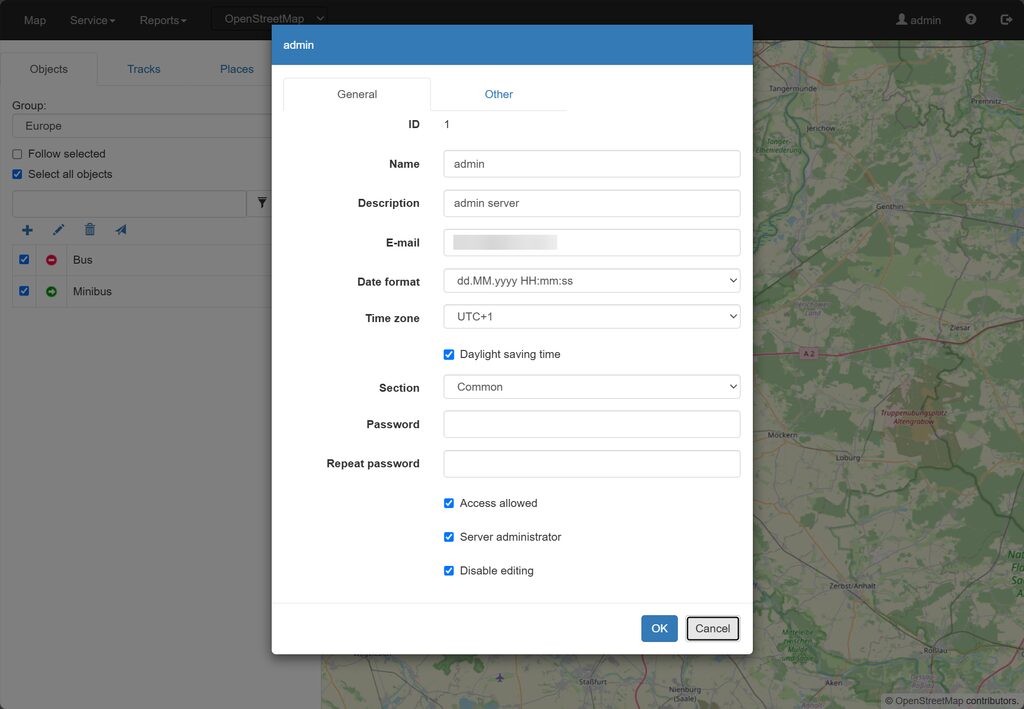
Clicking the user name in the top panel opens the current user account form.
The “General” tab contains the account parameters available to the user: name, description, e-mail, date format, time zone, password, and other fields available for the user’s role.
The “Other” tab contains the user’s default values for speeding and parking.
When editing their own account, the user works with the available parameter tabs. The tabs for managing access rights and object group permissions are not used for self-editing.
“OK” — saves the changes; “Cancel” — closes the form without saving.
The logout command on the right side of the top panel ends the session and opens the login page.
Access Rights and Administrative Roles
Glovizor uses a single administrative role — “Server administrator”. This term refers to a user with global access to the entire installation.
Regular User
A regular user works within the assigned section. Their capabilities are determined by functional permissions, object group permissions, and protection of individual records from editing.
If no object groups are selected in the permissions, the user has access to all objects in their section within the granted functional permissions.
Server Administrator
The server administrator creates sections, switches between them, and can manage the data of any section. Regular access rights and object group restrictions do not apply to the server administrator.
The server administrator has access to global server settings, device models and protocols, restarting the GPS data reception server, retransmitters, log viewing, and message dumps.
The “Disable editing” checkbox in protected forms is available to the server administrator and is used to prevent regular users from making changes.
Data Retention and Automatic Cleanup
GPS data and message dumps are among the fastest-growing types of system data, so automatic cleanup based on retention periods is provided for them.
The GPS data retention period is configured separately for each section in the “Data retention period, days” field. GPS data older than the specified period is deleted automatically.
The message dump retention period and daily cleanup parameters are configured manually in the setting.cfg configuration file:
[dump]
max_day=7
clear_hour_start=1
clear_max_minute=180
“max_day” — message dump retention period in days. Dumps older than the specified period are deleted automatically.
“clear_hour_start” — the hour, according to server time, when the daily data cleanup starts.
“clear_max_minute” — the maximum duration of a single cleanup run in minutes. When this time expires, the current cleanup run stops. If the cleanup is not completed, the remaining data will be processed during subsequent daily runs.
Workstation Requirements
The Glovizor web interface is designed for use on a desktop computer or laptop. On tablets with screens of approximately 10 inches, some interface elements may not fit on the screen.